

How Long Does an Emergency Roof Tarp Actually Last?
An emergency roof tarp typically survives 30 to 90 days in Canadian weather. That’s the honest range we’ve seen across hundreds of tarping jobs since 2012. The lifespan depends on three things: tarp grade, how it’s fastened, and what season you’re in. A standard blue poly tarp from a hardware store starts degrading from UV exposure within two to three weeks during summer. Heavy-duty woven tarps with UV-inhibitor coatings can push 90 days, but they aren’t truly waterproof once grommets pull through or snow creates pooling pockets.
Here’s what most articles won’t tell you: the question isn’t how long a tarp can stay on your roof. It’s how long it should stay before the secondary damage underneath costs more than the original repair. We’ve pulled tarps off roofs after 45 days and found $3,000 worth of rotted OSB sheathing that wasn’t damaged when the tarp went on. That’s the hidden cost nobody talks about.
What Happens Under a Roof Tarp Week by Week
This is where our field experience tells a different story than the generic advice you’ll find online. We’ve documented what happens under tarps at two-week intervals, and the degradation timeline is consistent enough to be predictable.
Weeks 1 to 2: A properly secured tarp holds well. But moisture trapped between the tarp and the roof surface starts a condensation cycle almost immediately. You won’t see damage yet, but the clock is ticking.
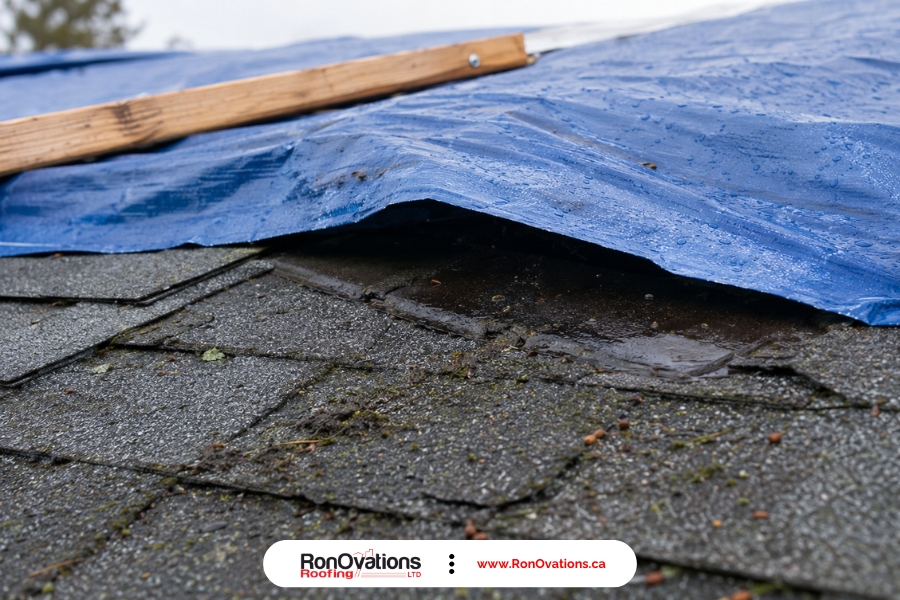
Weeks 3 to 4: Lift the tarp edge and you’ll notice a musty smell. Granule paste forms on asphalt shingles where moisture sits. Mould spores can appear on exposed sheathing, especially if the decking was already damp when the tarp went on.
Weeks 5 to 8: Poly tarps become brittle and start cracking at fold lines. Decking may feel soft underfoot in the damaged zone. If you’re walking on it, that’s a warning sign the OSB is swelling.
Beyond 90 days: Even heavy-duty tarps that look intact from the ground can have grommets pulling through. Underneath, we’ve found black mould colonies and sheathing so rotted you could push a screwdriver through it.
When does mould start growing under a roof tarp?
Mould can begin colonizing exposed sheathing within three to four weeks, especially when moisture is trapped under the tarp with limited airflow. In summer humidity, we’ve seen visible mould as early as 18 days. The Ontario Building Code (OBC) requires mould remediation before re-roofing, so catching it early saves real money.
Poly Tarp vs. Heavy-Duty Woven Tarp vs. Shrink-Wrap
Not all tarps are equal, and the price difference between them is small compared to the cost of getting it wrong. Here’s what we’ve seen in the field across Ontario roofs.
| Tarp Type | Cost (CAD) | Realistic Lifespan | Wind Resistance | Best Use Case |
|---|---|---|---|---|
| Blue Poly Tarp | $15 – $40 | 14 – 28 days | Fails above 60 km/h | Same-week repair planned |
| Heavy-Duty Woven Tarp (UV-coated) | $60 – $150 | 60 – 90 days | Holds to 80 – 90 km/h | Insurance claim in progress |
| Shrink-Wrap System | $500 – $1,500 | 90 – 180 days | Excellent | Extended delays, winter coverage |
| Temporary Membrane Patch (Flat Roof) | $100 – $300 | Varies by adhesion | N/A (adhered) | TPO/EPDM flat roofs |
Blue poly tarps are the cheapest option, but they’re essentially disposable. We don’t recommend them unless you’ve already got a crew scheduled within the week. Heavy-duty woven tarps hit the sweet spot for most residential emergencies. They buy you enough time for insurance processing and permit applications without the high cost of shrink-wrap.
Is a heavy-duty tarp worth the extra cost for emergency roof repair?
Yes, almost always. Spending $60 to $150 on a heavy-duty woven tarp instead of $15 on a poly tarp can mean the difference between 14 days and 90 days of protection. That extra time is critical when you’re waiting on an insurance adjuster or a building permit. We’ve seen poly tarps fail after a single windstorm, turning a $500 repair into a $3,000 sheathing replacement.

Winter Tarps Are a Different Beast
If you think summer tarps degrade fast, winter in Ontario and across Canada adds a whole other set of problems. Freeze-thaw cycles are the main enemy. Water seeps under the tarp edge, freezes overnight, expands, and lifts the tarp further from the decking. Each cycle widens the gap.
Snow load creates pooling pockets that stress grommets and can tear even heavy-duty tarps. Ice dams form at tarp edges because the tarp alters the roof’s thermal profile. We’ve seen tarps installed in November that needed re-securing by mid-January, and again by late February.
Poly tarps become dangerously brittle at -20°C and below. They’ll crack if you try to adjust them. If you’re heading into winter with a tarp, budget for at least one mid-winter inspection and possible re-tarping. A shrink-wrap system is worth considering if your permanent repair won’t happen until spring.
What happens under a roof tarp in winter, ice, mould, rot?
All three. Freeze-thaw cycles push water deeper under the tarp with each cycle, creating ice dams at the edges. Mould growth slows in cold temperatures but doesn’t stop entirely, especially in insulated attic spaces where the temperature stays above freezing. Rot accelerates during spring thaw when all that trapped moisture saturates the sheathing at once. We’ve pulled tarps in April and found sheathing that was solid in November completely delaminated.
Does Your Insurance Clock Start When the Tarp Goes On?
Most Canadian homeowner policies require you to mitigate further damage after a covered event, and tarping is part of that duty. But here’s what catches people off guard: the tarp is a temporary measure, not a repair. Your insurer expects a permanent repair timeline.
Leaving a tarp on for more than six months without a documented repair plan can be interpreted as a failure to mitigate. That can weaken or void your claim entirely. We’ve seen it happen.
Does leaving a tarp on a roof void insurance coverage?
It can. If your insurer determines you didn’t pursue a permanent repair within a reasonable timeframe, they may deny coverage for secondary damage, the mould, the rot, the interior water stains. Document everything: dated photos before and after tarping, receipts for materials and labour, and all communication with your adjuster. Most insurers cover emergency tarping costs in the $300 to $800 range. Notify your insurer within 24 to 48 hours of the damage.

What Emergency Roof Tarping Costs in Ontario
DIY tarping runs $40 to $150 for materials, tarp, 2×4 battens, screws, and a caulking gun. Professional emergency tarping in Ontario typically costs $300 to $800, depending on roof pitch, height, and the size of the damaged area. After-hours or storm-surge pricing can push past $1,000, especially during widespread events when every roofer in the region is booked.
But the real cost isn’t the tarp itself. It’s the secondary damage from delays. Replacing rotted OSB sheathing runs $50 to $80 per 4×8 sheet plus labour. Mould remediation in an attic space can cost $2,000 to $5,000. Compare that to the average lifespan and replacement cost of Ontario roofs, $8,000 to $15,000 for GAF Timberline HDZ or Owens Corning Duration asphalt shingles, and you’ll see how delays can add 15 to 25 percent to the final bill. If you’re wondering how much does metal roofing cost as a longer-lasting alternative, expect $15,000 to $30,000 for a standard residential install.
What is the cost of emergency roof tarping in Ontario?
Professional emergency roof tarping in Ontario costs $300 to $800 for a standard residential job. DIY materials run $40 to $150. After-hours emergency calls during major storms can exceed $1,000. The bigger cost risk is waiting too long: secondary damage from a failed or aging tarp can add $2,000 to $5,000 in mould remediation and sheathing replacement to your final repair bill.
Can You Tarp a Roof Yourself, and Should You?
You can tarp a single-storey roof with a low slope in dry conditions if you’re comfortable working at height. Here’s the right way to do it: use 2×4 battens screwed through the tarp into the roof decking, not just the shingles. Extend the tarp at least four feet past the damaged area on all sides. Fold the top edge over the ridge cap and batten it down on the opposite slope.
Don’t use bungee cords, rope tied to gutters, or sandbags alone. We’ve responded to dozens of calls where DIY tarps secured with bungee cords blew off after one windstorm, leaving the homeowner worse off than before. Proper batten fastening is what separates a tarp that lasts 60 days from one that fails in a week.
Can I install a roof tarp myself or is it too dangerous?
It depends on your roof. On a single-storey home with a slope under 6/12 in dry weather, a careful homeowner can handle it. For anything above single-storey, steep pitches over 6/12, or wet and icy surfaces, hire a professional. Falls from roofs are a leading cause of serious injury in Canada. The Ontario Building Code (OBC) requires fall protection for work above 3 metres, and that applies to homeowners too. If you’re not confident, understanding roofing safety protocols is cheap compared to an emergency room visit.
Flat Roofs and Commercial Buildings Need a Different Approach
Tarps and flat roofs don’t mix well. Flat roofs naturally pool water, and a tarp laid over a flat surface creates more pooling, not less. For TPO and EPDM membrane roofs, a temporary patch with compatible adhesive and membrane scrap almost always outperforms a tarp. This is especially true for commercial roofing installation projects where downtime costs money and building codes demand engineered solutions.
Mule-Hide TPO and Carlisle EPDM both offer manufacturer-approved temporary patch kits that bond directly to the existing membrane. We keep both in our trucks because they’re faster to install and more reliable than trying to batten a tarp to a flat surface. Commercial buildings may also require an engineer’s sign-off before re-occupancy after storm damage. A tarp alone doesn’t satisfy that requirement.
The Hidden Cost of Waiting Too Long
This is the core message we want every homeowner to understand: a tarp is a bandage, not a cure. Every week it stays on, the risk of secondary damage increases. Here’s what we see when tarps stay on too long.
OSB sheathing swells and delaminates faster than plywood. After 60-plus days under a tarp, two to four sheets commonly need replacing. Mould colonizes attic sheathing within four to six weeks in warm weather. Fascia and soffit rot as water runs sideways under the tarp edge. Interior damage shows up as ceiling stains, peeling paint, and in severe cases, electrical hazards from water reaching junction boxes.
A $500 professional tarping job that prevents a $3,000 sheathing replacement is a smart investment. But only if you follow it with a permanent repair within 30 to 60 days. That’s the window. After that, you’re gambling.
From Tarp to Permanent Fix, the Real Timeline
There’s a big difference between on-site work time and total project lifecycle, and confusing the two leads to frustration. Here’s what each phase actually looks like.
On-site repair time: A localized shingle repair takes 2 to 6 hours. A full asphalt shingle replacement on a standard residential roof takes 1 to 3 days. Metal roof maintenance considerations aside, metal roofing systems can take 3 to 5 days to install depending on complexity.
Total project lifecycle: Insurance claim processing takes 1 to 4 weeks. Building permit applications in Ontario municipalities run 1 to 2 weeks. Material ordering is 1 to 5 days for common shingles like IKO Cambridge or BP Mystique, but 2 to 4 weeks for specialty products like Decra stone-coated steel or CertainTeed Landmark in less common colours. Crew scheduling adds another 1 to 2 weeks during peak season.
Realistically, expect 3 to 8 weeks from storm damage to completed repair if everything moves smoothly. Delays, back-ordered materials, slow adjuster response, permit backlogs can stretch this to 10 to 16 weeks. Start your insurance claim and get a roofing estimate within the first week. That single step is the best thing you can do to avoid tarp failure. Homeowners searching for roof repair in Vaughan or through roofing companies in Winnipeg should prioritize contractors who can provide both emergency tarping and permanent repair under one scope of work. Similarly, if you’re looking for a Barrie roofing company, ask about their emergency response timelines upfront.
Frequently Asked Questions
How long can a tarp stay on a roof before it causes more damage?
A heavy-duty woven tarp can hold for 60 to 90 days in moderate conditions, but secondary damage, mould, rot, sheathing delamination often begins within 30 days underneath. Poly tarps degrade faster, especially in direct sun. The safest window for a permanent repair is within 30 to 60 days of tarping, regardless of tarp type. As a GAF Certified contractor, we recommend treating 30 days as your action deadline.
Can a roof be repaired instead of replaced after storm damage?
Yes, if the damage is limited to a small area, a few missing shingles, torn flashing, or a single puncture. If more than 25 to 30 percent of the roof surface is compromised, or if the sheathing underneath is rotted or water-damaged, a full replacement is usually the more cost-effective and code-compliant path. Your insurance adjuster and a qualified roofer should both weigh in before you decide.
Does insurance cover emergency roof tarping in Canada?
Most Canadian homeowner policies cover emergency tarping as part of your duty to mitigate further damage. Typical reimbursement ranges from $300 to $800. Keep all receipts, take dated photos before and after tarping, and notify your insurer within 24 to 48 hours. Failing to tarp promptly can actually weaken your claim for the permanent repair.
Can I install a roof tarp myself safely?
On a single-storey home with a low-slope roof in dry conditions, a careful homeowner can install a tarp using 2×4 battens screwed through the tarp into the decking. For anything above single-storey, steep pitches over 6/12, or wet and icy surfaces, hire a professional. Falls from roofs cause serious injuries every year, and the Ontario Building Code (OBC) requires fall protection for work above 3 metres.
What’s the best tarp material for a Canadian roof emergency?
Heavy-duty woven polyethylene with a UV-inhibitor coating is the best balance of cost and durability for most residential emergencies. It costs $60 to $150 and lasts 60 to 90 days when properly fastened with 2×4 battens. Shrink-wrap systems offer superior protection for winter or extended waits but cost $500 to $1,500. Avoid standard blue poly tarps unless your repair is happening within the week.
An emergency roof tarp buys you time, but it doesn’t buy you safety. The degradation happening underneath is invisible from the ground, and every week of delay increases the cost of your permanent repair. Get your insurance claim started within 48 hours, secure a roofing estimate within the first week, and treat 30 days as your target for moving from tarp to permanent fix. If you’re past 60 days, have someone inspect the sheathing before the repair crew arrives. You may need additional work that wasn’t in the original scope. For more on storm damage repair options, see our roof repair resource page. Whether you’re in Huntsville, Parry Sound, Midland, Gravenhurst, Severn, or Coldwater, understanding your tarp’s limitations is the first step toward protecting your home and your wallet.